
Distressing A Wood Entry Door
Love the look of a rustic, weathered door with heavy iron hardware? I do too! In honor of our new line of Agave Ironworks door and home hardware which you can now buy at CompleteHomeHardware.com and in our Franklin, TN showroom, I set off on a project to weather a brand new wood door. It will make the perfect backdrop for these distinctive, hand forged wrought iron pieces which I can’t wait to share with Complete Home Hardware customers.
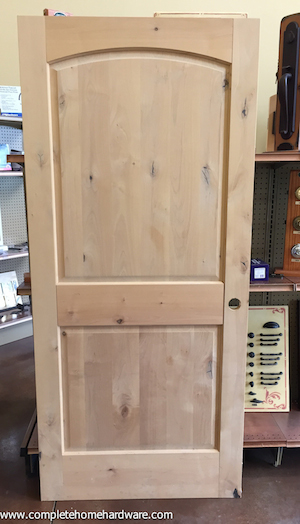
The faux “weathered” look is easy to achieve. I started with an unfinished, blonde wood door. However, a properly sanded old door would only add to the desired effects of the steps outlined below. Want to get the same look for your home? Follow along to learn the steps to copy this look for a door or piece of furniture. This is a fool-proof project with lots of room for error and an authentic, weathered result.
What You Need:
- 2 Contrasting Colors of Flat Interior House Paint
- Ebony Minwax Wood Stain
- Valspar® Signature Colors® Weathered Crackle Glaze
- Petroleum Jelly
- Rags
- Cheap Paint Brushes
- Paint Pan
Step 1:
Lay the door flat to avoid paint and stain runs. Wet any areas that you would like the wood to remain showing with a rag or sponge. Brush a bit of the ebony Minwax directly onto the wet areas and immediately wipe it back off with the same wet rag. (The longer you let the stain sit, the darker the wood will be after it is wiped off. To achieve the grey aged look, wipe the stain off quickly.)
Let stain dry for about 10 minutes.
Step 2:
Use generous globs of petroleum jelly to cover the areas you’ve just stained. This will prevent the paint in the next step from sticking to the wood. (No need to buy a large tub of Vaseline. For a project this size I got away with a cheap, $0.99 pocket sized container.)
Step 3:
Using the same paintbrush, brush on the bottom color of flat interior house paint. This will be the color that shows through the main color of the door. I chose red. The greatest thing about this project is the room for error. You don’t need to be a perfectionist. Just quickly cover the door and let it be.
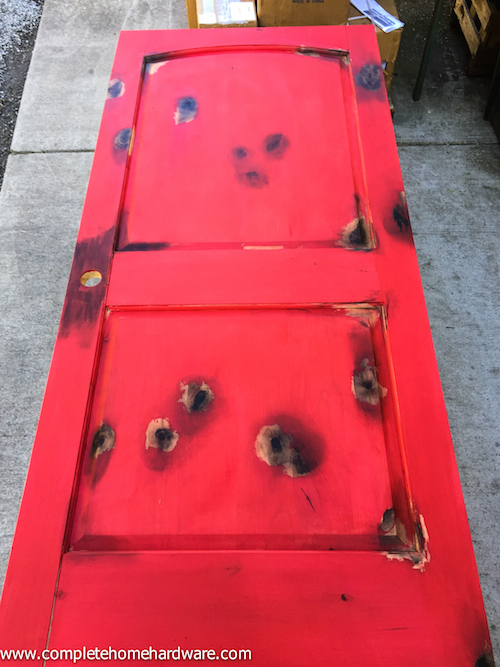
The door after Step 3 - note stained areas that will be visible through the crackle once the door is complete.
Step 4:
Check your petroleum jelly and see if it needs to be re-applied to any areas that you want to show through before applying the glaze and paint for this next step. Then, using a new paintbrush, apply a heavy layer of the Valspar® Signature Colors® Weathered Crackle Glaze. Let the glaze sit only long enough to get “tacky.” I waited about 10 minutes.
Step 5:
Apply a fairly thin top coat of flat interior house paint. By the time you are done with the bottom of the door, you will start to see the crackle effect happening on the top of the door. You can seal the door when you are done to prevent further weathering. We did not - so that any chipping or peeling will seem intentional and the door will continue to “age” as time goes by.
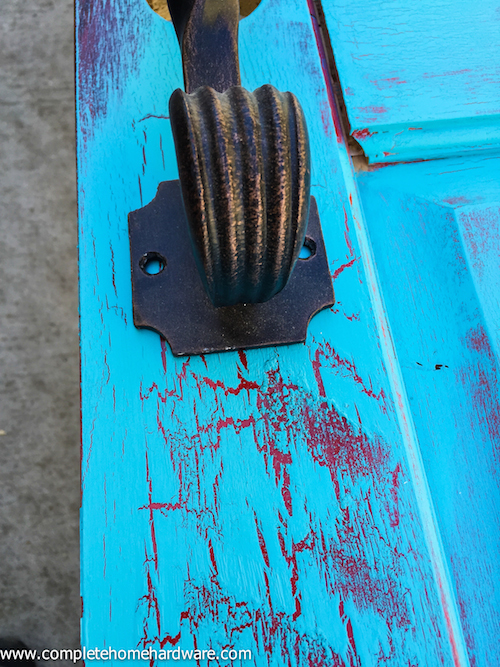
The crackle effect allows the base color to show through on the finished door. See it against one of our wrought iron door handles from Agave Ironworks.
Stop in the store to see the finished product and to shop Agave Ironworks collection for your home. Or, click here to shop them online now.
Recent Posts
-
Understanding the Functions of Door Hardware
When it comes to the functionality of our homes and buildings, doo …23rd Apr 2024 -

Color Splash: How to Easily Add Color To Your Home
Two popular trends in home design may seem like polar opposites, but have a common design challenge. …9th Sep 2015 -

Distressing A Wood Entry Door
Love the look of a rustic, weathered door with heavy iron hardware? I do too! In honor of our new li …17th May 2015